Rock Climbing Part 2 - Advanced
These notes are intended to assist the climber who has already gained some knowledge of rock climbing and is fully aware of its risks but still wishes to progress further up the grades, and indeed the mountains. They are brief and not designed to be comprehensive in any way.
Ultimately climbing is a dangerous sport and claims many casualties each year. One of the guiding principals of British climbing and mountaineering is that it is the individual climber is responsible for his or her own safety. If you cannot accept this then this site and probably climbing in general is unlikely to suit you. May we refer you to this very interesting site instead!
This section should be read in conjunction with the page on Basic Climbing.
Virtually every climber reckons their rack is the best! And so it is - for them at least. So these notes are very personal and are only intended to give an idea of a suitable rack for leading long pitches at the upper end of your grade ability. It goes without saying that not everything would be carried on every route - there is little point in carrying all this lot on a 15m pitch.
An Advanced Rack for High Mountain Areas

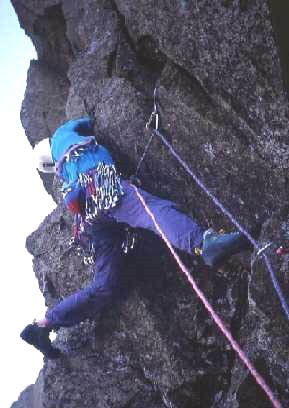
Professional Mountain Guide Colin Wornham starting the crux pitch of Goodbye to All That (E1, 4c,5b,5a,5b) Pillar Rock, during the second ascent.
Note the extensive selection of gear needed to protect a long high mountain route of this sort. Also that he is climbing on double 'half' ropes.
| Cams |
Camalots (or their equivalent), sizes 0.3 - 3 inclusive, each on its own krab |
| Rocks |
set on wire 1 – 10
all these "wires" should be racked on two krabs, small on one, and large on the other |
| Wallnuts |
set on wire 1 – 10
all these "wires" should be racked on two krabs, small on one, and large on the other |
| Microwires |
set of 0 – 5
RP type - all these micros should be racked on one krab |
| Rockcentrics (or similar large nuts) |
7, 6 & 5 on Dyneema are handy for belays - best all racked on one krab |
| Quickdraws |
To extend the wires you will need around 4 x 10cm (useful at the wall too), 6 x 15cm and 2 x 20cm |
| Slings |
For threads, and tree and spike belays 3 x Long (120cm) each with one krab, and 3 x Short (60cm) slings each with two (the latter can be used as extra long extenders) |
| Screwgate Karabiners |
4, small (10mm) for setting up belays |
| Ropes |
2 "half" ropes for preference as this greatly increase your safety (less drag, and double length abseils possible). This is what is known as double-rope technique |
| Belay Device |
1 - check out devices like the Black Diamond ATC XP which give much better friction on narrow ropes |
| Belay Karabiner |
1 x Belay Karabiner for use with the belay device – people used to use HMS karabiners for this but a proper belay krab is safer |
| Prussik Loops |
Set of 2 (and the knowledge of how to use them!) |
| Nutkey |
1 - you will soon get the cost back! |
| Helmet |
Well worth considering |
For Gritstone and Sandstone Outcrops and Granite Crags add:
| Cams |
Double up on Camalot sizes 1, 2 and 3 (or their equivalent), and size 4 can be handy |
| Rockcentrics |
Sizes 8 and 9 or equivalent if you can't afford extra cams |
| Wires |
You will probably need fewer wires, and RPs only on certain very hard routes |
For Limestone and Slate add:
| Cams |
May or may not be useful (depending on route). Ultra small Camming Devices such as Micro-Camalots and Zeros are also great - if you can afford them! |
| Wires |
More small wires will almost certainly come in handy on a long pitch. Consider trebling up on Rocks 1 - 7 |
Marking your Gear:
A final point … As your rack grows you will find it hard to remember just exactly what is yours and what belongs to your climbing partner. If you are an easy-going sort this can soon lead to the size of your rack diminishing whilst your partner's grows accordingly! To avoid this we recommend that you mark your gear: but not by using spray paint, or cutting notches in it with a hacksaw (we know of people who have done both these things!). Most people use electrical tape to mark kit but Trango Rack Tags offer a wider range of colours.
Photo: Jeff Appleyard on the final pitch of Dream of White Horses (HVS, 4c), Gorgath, North Wales, a good place for lots of gear and extending your runners properly!
| “To put yourself into a situation where a mistake cannot necessarily be recouped, where the life you lose may be your own, clears the head wonderfully. It puts domestic problems back into proportion and adds an element of seriousness to your drab, routine life. Perhaps this is one reason why climbing has become increasingly hard as society has become increasingly, disproportionately, coddling.” |
| Al Alvarez |